About the tools...most are
homemade or modified tools and they work well. I'll assume
you have the Bentley and lack only the
'proper'
tools to get going.
OK...in general sequence, here's a
rough guide to getting
it apart. Special tools - those which are not in the average
Joe's
toolbox, modified standard tools, or build-from-scratch - are boldface.
Assuming you have the tranny out...
-
First, empty it. You should have
already done this, but realistically, sometimes we just get trannies
that someone else didn't empty, or we forgot. Get a 17mm
allen wrench for the drain plug. Don't fart around
with a lug nut, get the right tool. $9
from Sears.
-
Now, let's get the flanges
off. First, remove the little disk seal...pierce it by
whapping a sharp screwdriver or punch through it. There's
nothing behind there that you'll hurt. Then pry it out.
-
For disassembly, you may need
some sort of flange
compressor tool to squeeze the strong spring behind
the flange. I usually attempt to do this without the
compressor, and just pop off the circlip, keeping a hand over the
flange doesn't pop off and donk me in the head. Sometimes
they get sticky and I have to whack them with a deadblow hammer to
unseat them. Less commonly, I have to use a gear
puller. But for safety's sake, YOU must use a
compressor. The 'standard' tool is a piece of bar stock bent
into a flat-bottomed U, with a hole drilled in the flat
bottom. A piece of threaded rod and a nut are all that's
required. I think the thread is M10-1.50 but check for
yourself! I have to be sure before I correct this
page. Don't have/can't make and in a pinch? Get the
tool anyway. Other choices which have been known to work, and
are NOT recommended (so don't do this) are pipe clamps (like for
woodworking),
spanning both flanges. Or really cheesy - a ratcheting
luggage strap - wrap it around both flanges and crank it
down. Hey, it has worked once for me.
-
Getting the circlip out is a
cinch with the right tool: Circlip pliers.
They look something like this,
McMaster-Carr P/N 5773A14.
Something similar is around $17 at your local FLAPS. You'll
probably have to grind/file the tip a little to fit down in the groove
where the
circlip is. As they come, they are too wide. Don't
even bother farting around with screwdrivers, regular
pliers, snap-ring pliers, etc. You will be beating your head into a
wall. Just go buy the circlip pliers.
- OK, save all the bits but the circlips, and clean
everything up. I recommend a 1/2"
diameter stainless steel bottle brush for lotsa little nooks
and crannies, including the flange splines.
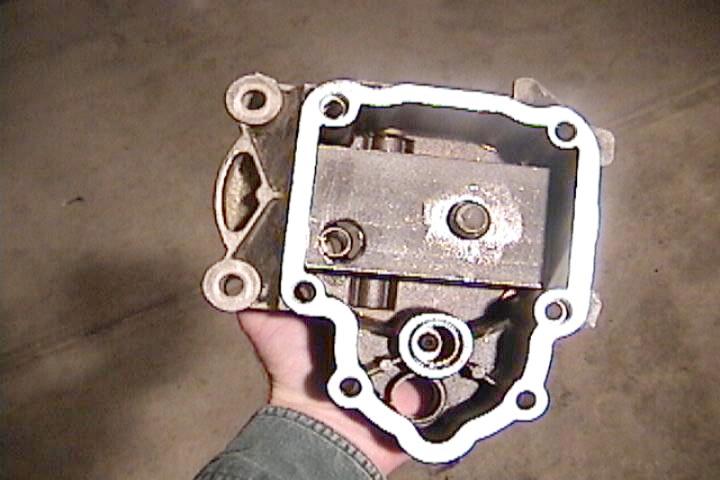
- Now we have the 5th gear cover ready to come off, that
should be pretty obvious. After you remove it, you'll see the
5th gears and forks staring at you. Also, a rod sticking out
of a hole. Do yourself a favor, DON'T remove that
rod yet. We'll work around it and remove it later.
Just a note, this is the rod that all the shifter forks ride
on. Pull it out and you'll HAVE to split the case because
once those forks all fall away from where they belong (and boy do
they), you're screwed. I've made a few bucks just putting
these back in for folks.
- It's time to remove the shifter. Under the clutch
cable perch, there's a big recessed hex plug. Gotta get that
off, but first remove the 13mm nut holding the shifter arm
on. For the big plug, the "right"
tool is a big hex...26mm across flats. I have heard that an
old VW sparkplug tool works. I have made my own by welding a
3/4-10 nut to a bolt, and using my angle grinder to trim the flats down
from 1.120" to about 1.080" across flats. Or just until it
fits. If you don't have any of the aforementioned tools, BIG
channellocks work acceptably well. Use a long pipe on the
longer handle to get some
leverage. Squeeze very tight and it won’t scar the OD too
badly. Once you get the plug out, pop out the shifter guts
and spring.
- Next step is to get 5th gear off. The big bolt on
the ass end of the mainshaft has to come off, but it's torqued to about
130ft-lbs. You'll spin the gearbox if you put a wrench on it
so we have to lock the gearbox against itself. That's really
why we took the shifter assembly out, so we can move the forks around
(another reason to NOT remove that shaft I told you about!) and engage
two gears at once. You'll see the fingers in there, just push and turn
the tranny until any gear falls in, then engage 5th from the slider you
see.
- Now, suppose you really screwed up and did pull that shaft
out. And you can't lock the gearbox so you can remove the
nut. What to do? Well, I have put a penny between
the 5th gears on scrap trannies to lock things up. It worked
but even I wouldn't try this for good gearboxes
and expect 5th to live. Those gears are hard as hell but as
you know, steel gives us brittleness when hardened, as gears are, and
you can break a tooth off. It's not difficult.
- To get the bolt off, you'll need a 12mm triple
square bit - the same one that fits cylinder head bolts. IT'S
NOT A TORX!! DON'T TRY. Lisle sells a A "Triple
Square" bit set in a 3-pack that contains what you
need. Large is for 5th gear (also head bolts), small is for mainshaft
rear
bearing, medium is for inner CV-flange bolts. This
image was stolen
without permission from http://www.thetoolwarehouse.net/shop/LIS-60750.html,
so buy your stuff from them. Yes I know it's a 4-pack but
what I've bought
locally is always a 3-pack. Go figure.
Now, actually removing the bolt, which is butt-tight, wrap
the end of a long bar in a shop towel, then put that into
the bore where the shifter mechanism came out of. I brace that against
my body while I tug on the breaker bar. Be careful that no
pressure rests on the clutch cable perch or (I guess) there's a chance
you could break it off...I haven't done this.
- On to removing 5th gears. There's a lock plate
that holds the 5th gear fork adjustment in place. Gradually
and gently pry it up and free. Then unscrew the adjustment
until it's free. SURPRISE! It's a left-handed
thread. There’s a
special tool for adjusting/removing/installing the 5th gear
shifter fork - a simple cylinder with a two tits on the end.
I have no decent homebrew substitute, but I have used small
channellocks with success.
- Now, you can remove 5th gears. A
nail puller is handy to pry them off - just protect
the case mating surface with something. A little heat may
help too. Here's
a pic using the nail puller, it's posed, so no cushion is under it.
- As you pull off 5th gear, you will have to move all sliders
back into neutral position, because the shafts will want to rotate with
the helix of the gears. Also, you should strive to keep the
hub/slider/synchro assembly together. It makes things a lot
easier to reassemble.
- Oh boy! Now we get to actually split the
case! And see the guts! I have split them with a
deadblow hammer on the back of the
mainshaft, but that's for scrap trannies. Early on, I
fabricated a splitter from a piece of angle iron, drilling two holes to
span the
5th gear covers' farthest bolts, and drilling/tapping one hole
to push on the end of the mainshaft. More recently I made the Cheapass
Ron 020
Gearbox Separator, shown below. I used channel because I had
it laying
around, but 1/4" plate should work and you might not need the nut I had
to
weld on (That's a 3/4-20 nut and bolt, IIRC, the nut
fit cleanly into the throwout bearing bore so I used it). You
shouldn't
need dimensions if you have your 5th gear cover off, but if you don't,
I'll try
to get them done. The tool is pretty cool, I have to admit.

Left: the basic
tool. The
tool fit into the case. Note the
clearance hole for the
shift fork rod! (lower
left)
Above:
all fitted up. Bolt the 5th gear cover back on with the tool
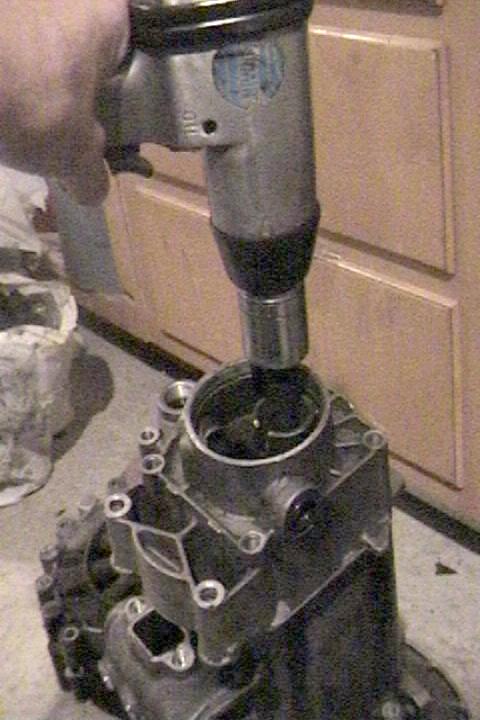
inside. Keen eyes will note that I don't have these bolts in
place...just for the photo. Tighten the big bolt against the
end of the mainshaft, shown here being done with my Cheapass Impact
Wrench (Taiwanese special). The gearcase will
separate gradually and neatly from the clutch cover half. Of
course, you'll have all the
bolts out before doing this, right? Including the reverse
gear support
shaft bolt? Hmm?
One thing I don't do that the Bentley
tells you to do is remove the rear mainshaft ball bearing from the
case (this is in their procedure to separate the cases). This is the
ball bearing that is pressed into the case, held in place by 4 bolts,
and pressed onto the shaft (how's that for ridiculous engineering? This
is evidence of VW's kluge approach to re-engineering their old 4-speed
into the 020 5-speed). Anyway, just leave it there.
Those 4 bolts looking at you from the ass end of the gear case (with
5th gear cover removed) are nasty tight, and I've snapped both
bolt heads and a triple-square bit trying to get them off! That bearing
seldom fails, and if you're doing a teardown to address another
known, isolated issue (like a bolt kit or known bad synchro) you're
best off leaving it as is. Just pull the case off with the bearing in
situ and reinstall the same way. No biggie.
-
Now that
the case halves are apart, pull the shifter forks out as a unit, all
still attached to the rod. Set aside wrapped in a newspaper
baggie.
-
4th gear
must be removed from the pinion shaft to pull the mainshaft.
Circlip pliers used here. Then the entire mainshaft pops out
easily.
-
If you
want to pull the pinion shaft, required to do any ring gear work, you
must pull 3rd in the same manner as you did 4th.
-
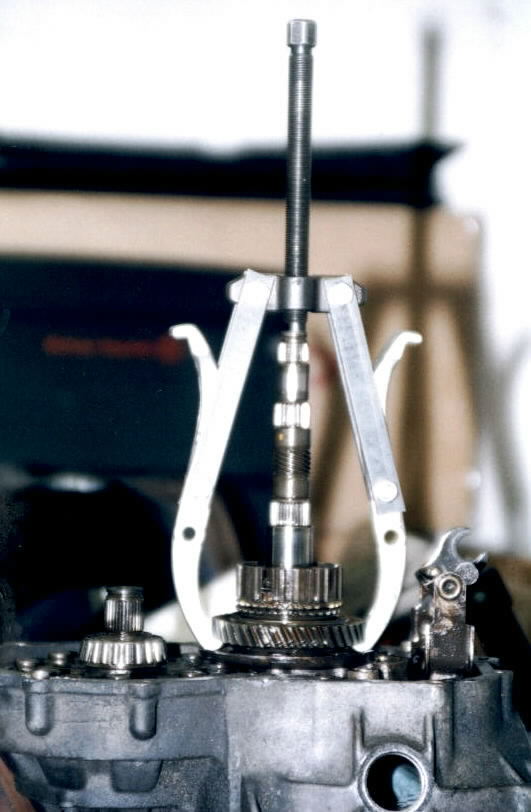
Then you
have to pull the 1/2 hub/slider assembly off, which requires a special
2-jaw gear puller, which is your standard issue Craftsman
puller but with homemade extensions as shown below. Home Depot provided
the flat stock. 1/8" thick I believe.
-
This is
to remove 1st and 2nd from the mainshaft. In real life I
would
have the entire 1/2 hub/slider/gear assy. still together on the
shaft.
This photo is from a first go-round on a buddies tranny. He
had already
pulled that stuff off. Note that part of this
process removes the
2nd gear needle bearing race, which is cylindrical. A tiny
touch of heat
on this at reassembly time and it'll just drop right back on.
-
Set
hub/slider assy. aside. Now you see the pinion bearing plate
and 4 bolts. Remove them to free up the pinion shaft and pop
it out. The diff can now be removed.
-
-If
you're going whole hog and renewing diff and/or
pinion bearings, don't worry about prying out the races (as per the
special tool
shown in Bentley). Pop the case half in a hot gas grill, or set it in
front of
your kerosene salamander heater, and the races fall right
out. Or may require a face-down slap onto some
2x4's. Yep, that works fine. Slap it hard.
-
- Oh, here's a useless link:
the
drawing and FAG part numbers for the diff bearings. Download
the
spreadsheet linked at the top of this page to get the VW part number.
- When doing a bolt-kit job, drilling/pounding out the rivets
should be done from the RING GEAR side. The Bentley shows some poor
slob trying to do this from the diff side. Lucky for him he was a model
and not a mechanic because he'd have gone nuts otherwise.
- Also, to remove the ring gear (if installing a Quaife or
whatever) just whack it free from the diff with a deadblow.
When installing, heat the ring gear and it will drop into place. I pop
it in the gas grill or set it in front of my salamander. I used the
oven inside once and thought I'd have to sleep in the garage...things
get smoky and smelly...momma wasn't happy.
- Same trick for reinstalling the busher/washer on the bottom
of the 5th gear cluster. It fits so tight that it's hard enough to get
off
and damned near impossible to get back on without heat.
- Also, if your gearbox is all black and nasty inside,
someone probably ran it low on oil. 5th gear suffers and may begin to
pop out even after oil is added. Chances are that the needle bearing on
5th is melted - the needles are held by a plastic retainer and that's
what melts, and can cause this problem.
- Speedo gears: be careful when installing
because they can and do fall inside, ne'er to be seen again, except as
little
colored flakes floating around your gear oil...they get caught up in
the keys of
the sliders and can't do any good.
-
FWIW, it's the RED
gear that's for a 3.67 final drive tranny and the WHITE
one for the 3.89 and 3.94 F/Ds. The 4.25 gets a different
one, but those
are rare and those guys are nuts anyway. If your speedo is
off, check that
first...chances are there's nothing wrong with your cluster.
Oh...one more thing. It's good to have a
helper. I have found
that young sons ("garage gnomes") are useful if properly trained and
kept to simple tasks:

- email me at rapieper at yahoo dot com with any suggestions,
questions, etc.