Wheel Bearings, on the Car
VW A1 and A2 chassis. B1, B2 and '80s Audis are all similar.If your car has ABS, you'll need different tooling, shown on the bottom of the page.
All images are thumbnails, links open in new pages.
| Here are the major tools
used, wrench
is 32mm, one 30mm socket for the axle nut, one 36mm socket for the
press bolt. The bearing splitter has flats ground to get under the inner bearing race. The bearing press set is a Schley, this is an older version, newer sets have more parts, can do more makes and models. Google "Schley Tools". Schley's site is useless, you'll have to find a vendor. I've heard rumors the tool set can be rented.  major-tools.jpg 124.33 KB |
|
This is the press set. Old inner races have been saved from previous jobs, we'll get to why below. No worries, you'll have exactly the right race to use.  press-set.jpg 137.50 KB |
|
If the last guy to tighten the outer axle nuts got them on tighter than you can remove by hand, do this. The view is the same on both sides of the car. Brace the breaker bar to the ground, drive the car a few inches in 1st to loosen the right side, drive in reverse to loosen the left side. YIKES!! It occured to me that some who will see this might think that since this is a good way to loosen axle nuts, maybe it's a good way to tighten them too. NOT!! Torque spec on the axle nuts is 177 ft/lbs, call it 180. That's 180 pounds on a one foot bar, or 90 pounds on a two foot bar like the one in the pic. It does need to be tight, you do not need to jump on your breaker bar or use a 4 foot cheater. Racers like to intentionally overtorque these nuts, claiming extended bearing life under racing loads, that's probably true, ask a racer for confirmation. Get the car up on jack stands, remove the wheel, brake caliper and brake rotor. I don't tell how to remove brake components in this write up, if brakes are a challenge for you, you should question yourself regarding your current skill set and your ability to complete this job safely. I originally had this bass ackwards. DandyDanny on the vwvortex provided this corrected image, very nice work he did.  |
|
My preference is to take the knuckle off of the ball joint, pull the knuckle of the outer CV, set the knuckle back on the ball joint while pressing. Remove the pinch bolt shown, spray some rust penetrant into the ball joint boss of the knuckle. Those working on Rust Belt cars may prefer to leave the ball joint alone, instead, remove the entire drive shaft.  bj-pinch-bolt.jpg 94.29 KB |
|
If you choose to pull the knuckle off the ball joint, the knuckle will often get cocked sideways on the ball joint, hammer to the rescue. The knuckle/ball joint often binds on rust at this point, spray more penetrant, knock the ball joint back into place and try again. Several tries are occasionally required at this step.  knuckle-from-bj-01.jpg 101.44 KB |
|
This is about where the ball joint will hang up.  knuckle-from-bj-02.jpg 92.29 KB |
|
The knuckle has come free of the ball joint, the outer CV has been removed from the hub, the knuckle is back on the ball joint.  cv-out.jpg 97.53 KB |
|
The two long bolts used for hub removal. These are part of the press set. Oil or grease these bolt threads.  hub-removal-01.jpg 101.65 KB |
|
Hub being removed.  hub-removal-02.jpg 104.06 KB |
|
Hub is off, inner race of the inner half of the bearing is still in place. If your inner race stayed in the bearing, your hub is definitely junk. More about hubs later.  inner-race.jpg 94.70 KB |
|
Snap ring pliers, the tips taper out at the ends.  snap-ring-pliers.jpg 80.70 KB |
|
Snap ring and pliers. Look closely at the eye holes in the snap ring, they are tapered. The small end of the taper faces away from the installed bearing. Remove both inner and outer circlips now.  snap-ring.jpg 82.36 KB |
|
There are four pressing discs with this tool set, here, the correct disc is being selected by fitting it up to the new bearing.  selecting-press-disc.jpg 87.51 KB |
|
Here the tooling is in place and ready to start pressing the old bearing out of the knuckle. The inner sleeve for the receiver cup is used on these somewhat small A1 bearings. Check the new bearing fit into the receiver cup to determine if the inner sleeve is needed on your model car. The sleeve shows in the lower left of the 2nd pic above. Oil or grease the press bolt threads.  pressing-bearing.jpg 102.56 KB |
|
Pressing is taking place now. Note the use of the 32mm combination wrench. The box end is braced to the ground, the open end is on the long coupler nut on the press screw. If you use the box end on the press nut, as the nut and bearing pull towards the outside of the car, the box end will bind, the wrench WILL BREAK (I've been there so you don't have to).  pressing-bearing-02.jpg 113.48 KB |
|
Here the bearing is fully removed from the knuckle, the press nut has been backed off, the bearing is out of the receiver cup.  bearing-out.jpg 99.51 KB |
|
The bearing bore inside the knuckle. Rag out the rust, some penetrant can help. Scrape the rust out of the snap ring grooves.  knuckle-bore.jpg 98.76 KB |
|
Getting ready to pull the bearing in from the backside, use the same press disc and receiver cup (sleeve) as used for removal. The outer circlip is in place. Note a radiused edge on one end of the bearing, that goes in 1st. Oil or grease the press bolt threads. I know, you just did that, do it again.  installing-bearing-01.jpg 107.64 KB |
|
The bearing being pressed in. Continue pressing until the bearing fully seats against the outer circlip. Don't install the inner circlip yet.  installing-bearing-02.jpg 109.94 KB |
|
The puller and bearing splitter set up for removing the outer race. Sometimes you'll have an easily removed race, it'll come off with just a pair of large screwdrivers or prybars. Oil or grease the puller screw threads.  removing-inner-race-01.jpg 132.34 KB |
|
The inner race being removed. The prybar is keeping everything from turning.  removing-inner-race-02.jpg 132.50 KB |
|
Hub with rust, immediately after removal.  hub-01.jpg 87.41 KB |
|
Rust wire brushed off. This hub is actually junk, but I didn't know that yet. More about these hubs below.  hub-02.jpg 91.11 KB |
|
Using the old outside inner race from the hub on the press disc. This is a very important detail that's often overlooked. The hub must be fully pressed into the inner race of the inner side of the bearing to properly set the bearing preload. Failure to attend to this detail can lead to premature bearing failure in as few as 3,000 miles. --- Keeping this pre-load is also the reason for the often seen advice (also specificaly stated in Bentley) to NOT roll a car without outer CVs bolted in place. Many Techs keep discard outer CVs as dummies expressly for this purpose.  disc-plus-race.jpg 89.15 KB |
|
Hub being pressed in. A couple of the unused press discs are stacked between the active press disc/race and the press nut just to take up threads.  installing-hub-discs-stacked.jpg 104.34 KB |
|
Hub is fully pressed into the bearing. Now is the time to re-install the inner snap ring.  hub-installed.jpg 102.90 KB |
|
10.9 grading marks on the ball joint pinch bolt.  ten-point-nine.jpg 85.08 KB |
|
Shoulder on the 10.9 pinch bolt. DO NOT shortcut the grading and shoulder on this bolt, your life depends on it. Less than 10.9 grading will not pinch tight enough for the duration, it will stretch and if caught in time, only ruin the ball joint and the knuckle. Same for a fully threaded bolt, the ball joint will work against those threads until the assembly loosens. If not caught in time, ball joint separation from the knuckle while driving will result.  bj-pinch-bolt-shoulder.jpg 86.74 KB |
|
Hub comments. Way back when these cars were much newer, I found that usually if there was no wheel bearing play prior to dis-assembly, the hub would be OK. If there was perceptible play, the hub was pretty much 100% guaranteed to be junk. As little as 0.0005" (half a thousandth") undersize is all it takes to ruin a brand new bearing in a very few thousand miles. The car this write up was based on had no bearing play before tear down, just a whole lot of rotational noise from pitted bearing surfaces. I assumed the hub would be re-usable. On re-assembly, the new bearing has play, not much, but enough that I know a repeat failure is imminent. I did this job in December of 2007, it's now April 2008 and probably 4,000 miles have elapsed, there's no noise yet. I KNOW it's coming and probably overdue. --- Due to the age of these cars now, the rust seen on the hub sleeve is inevitable, that rust can easily take the hub sleeve down 0.005" or more. Just buy a new hub when you buy your bearing kit. --- It took about three times longer to write this write up that it takes to do the job. © 2008, tolusina on the 'tex and MK1Dubs.com. ;) |
|
The tooling needed to pull hubs on cars with ABS tone rings looks like this. 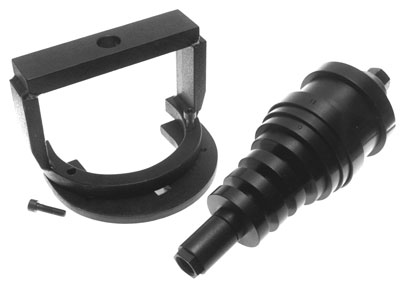 And was found here, http://www.sirtools.com/sirs-044.jpg From SIR Tools. back to top |